Pages

Thursday, January 31, 2013

Easy Valentines

As promised, here is an easy valentine treat. Does anyone else get excited when the measurements for projects come out so that you can get the most out of your paper? I just love paper! Especially a good heavy card stock like Stampin' Ups. 

Well here is an example of how I got the most out of an 8 1/2" x 11" piece of card stock. Three of these treats can be made from one sheet of paper. My measurements started out by measuring my cellophane bag I used on the inside to hold the M&Ms. The (resealable) cello bag measures 3 1/4" x 3 1/4" and I got them off Ebay some time ago. I am pretty sure that by now I should be getting a kickback from cellophane bag sellers on Ebay, but {sigh} I am not. I originally intended to use these bags for little 3"x 3" cards, but that hasn't happened. I can already see a future post...3"x 3" cards. 

Here the instructions:

  • 1 sheet of 8 1/2" x 11" heavy card stock (3 projects can be made from this one page, if you cut on the 8 1/2" side. Long side at the top of your cutter.)
  • Cut 3 1/2"x 8 1/2" 
  • Score on the 8 1/2" side (long side is at the top of your scorer) ...Score @ 1 1/2", 5", 5 1/2"
  • I stamped my greeting now, before I bent the paper. Also if you want to emboss (far right example below) I would do it now.
  • Fold on score lines
  • On the 1 1/2" tab, use an edge paper punch of your choice.
  • On this same 1 1/2" tab, fold this tab down and punch with a standard hole punch @ 1 1/2" and 2". These holes should be centered. (Punching through the tab and back of the treat bag at the same time.) Put ribbon through holes and tie.
  • On the other end, use the Extra Wide Oval Punch...slide the paper all the way in and center the punch. This will create the "window" so you can see the candy.
  • Fill candy in cellophane or perhaps you can make-shift a sandwich baggie if you don't have the cellophane bags. I taped it into place on the inside.
  • This is an upside down "matchbook" fold. Decorate as you wish. 

Need a video tutorial? 
Let me know if the written directions are not clear enough.


 Three examples...simple on the left. One ribbon tied as a bow. 
Middle: Three ribbons, tied in a know with Owl Punch.
Right: Embossed version, with Full Heart Punch.
Notice on the right example, I didn't center the oval window. 
It is off-set to the right so I could put the owl on.
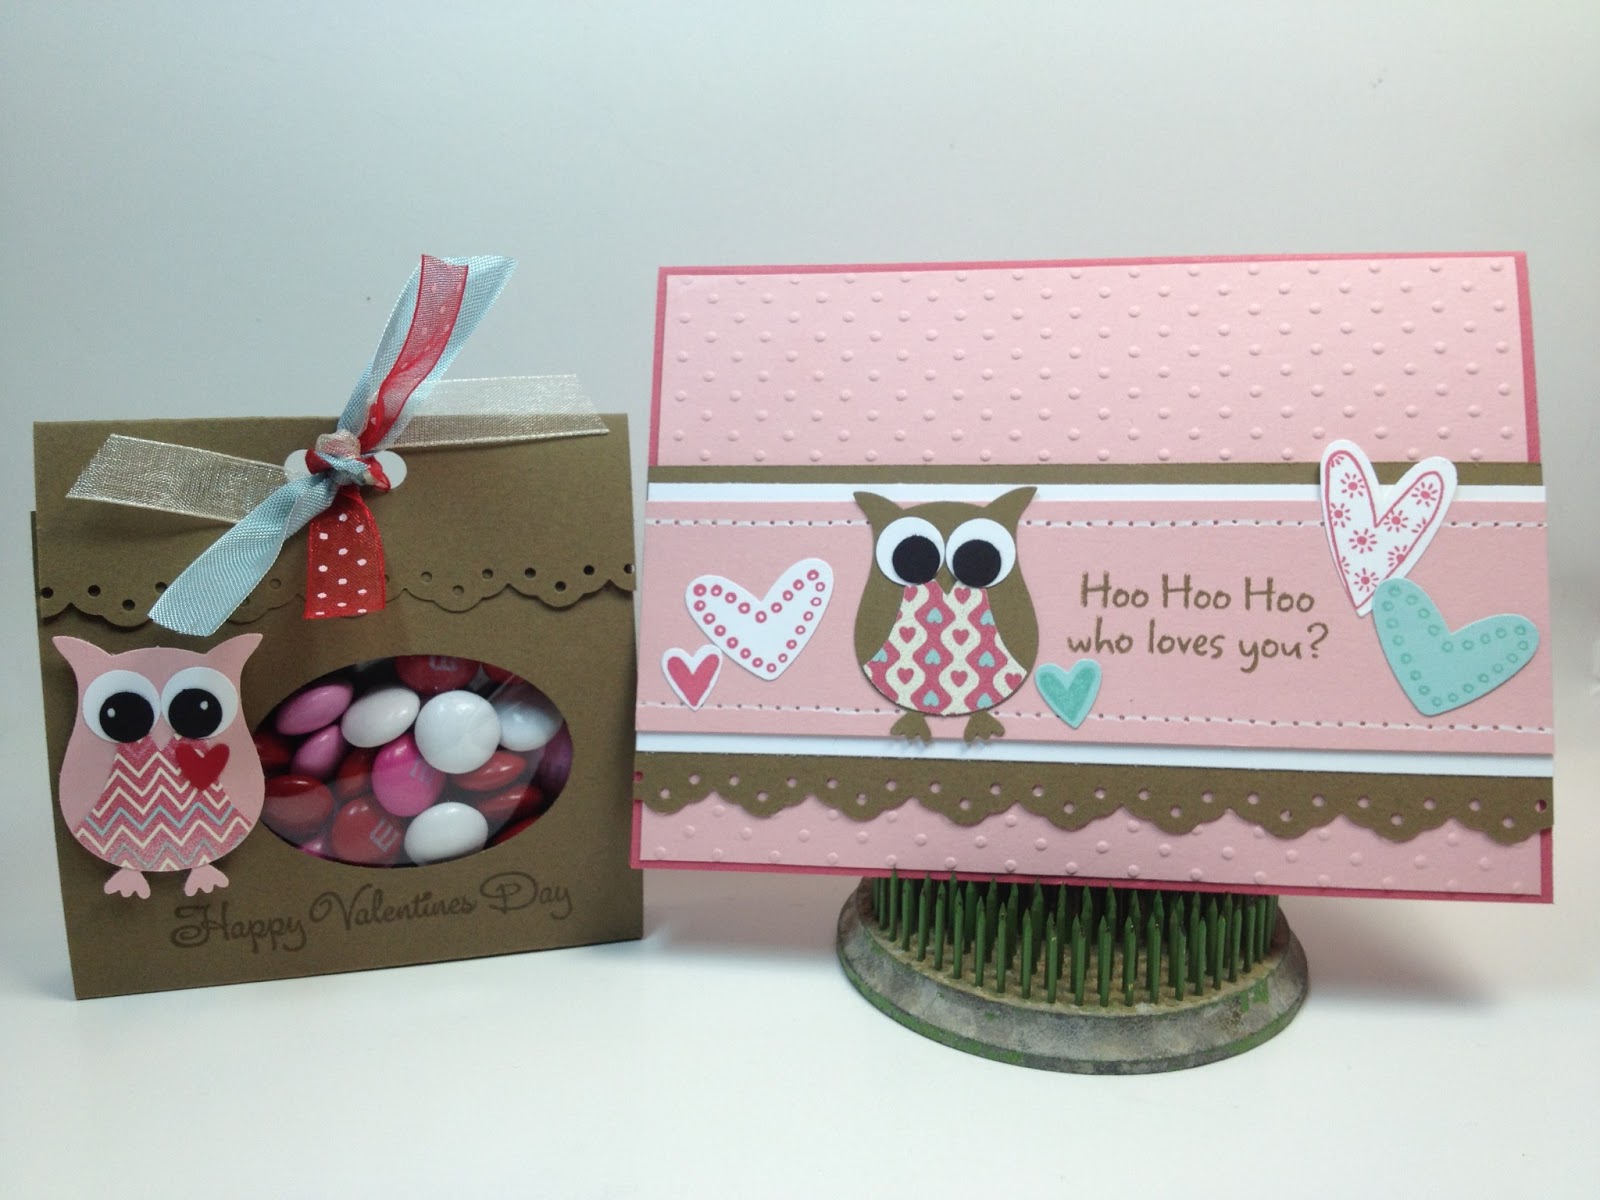
With the card from yesterday's post.

Dont forget to enter on my post Summer Smooches Squares for the BLOG CANDY. Leave a comment. As of this writing, I have two comments. The odds to win are REALLY good!! Drawing will be held Sunday night.


If you love paper and crafting come join me by LIKING my Facebook page at 
OR 
Before leaving my blog
get email updates by entering your email address in the right hand column where it says FOLLOW BY EMAIL.

Visit my Etsy store @

JOIN MY "PAPER PEEPS"  **One last mention...If you are thinking of becoming a Stampin Up Demonstrator, Please take some time to look through my blog (it is my crafting resume'). 
I'd love to have you on my "PAPER PEEPS" team.

Good Night, Happy Crafting and Thanks for Stopping By!!!!!


Wednesday, January 30, 2013

Hoo Hoo Hoo Who Loves You?

Don't get me wrong...I love Stampin Up products, but I am not immune to cute stamps! Today's card features Stampin Up's Owl Punch. The sentiment comes from Hampton Art called Who Loves You. Look close, do you notice something that looks like stitching on the card? Its faux stitching!! Saw this in a magazine the other day and just had to try it. Simply use your paper-piercing tool, punch the holes and use a white Uni-ball Signo Gel Pen to "connect the dots." 

Tomorrow I will post a coordinating 3-D project (with directions) that I intend to give to some special family peeps for Valentines Day. Check back!

Also, don't forget to visit my blog entry from Monday. I have a special BLOG CANDY offer. It can be found at Summer Smooches Squares.


 4" x 5 1/2" card base on Primrose Petals
Pretty in Pink, embossed mat:  3 7/8" x 5 3/8"
Soft Suede layer: 2 1/2" x 5 1/2" (before using the border punch)
Whisper White layer: 1 3/4" x 5 1/2"
Pretty in Pink (top layer, with faux stitching): 1 1/2" x 5 1/2"


I think the stitching looks faux fabulous!! 
Generally, faux this or faux that doesn't do it for me. But in this case, easy technique and it looks almost like the real thing. 

For the faux stitching, I used these materials:
Paper Piercing Tool # 126189

Signo White Gel Pen #105021

Paper Piercing Pack #126187
Use the bottom template with the straight line holes.


If you love paper and crafting come join me by LIKING my Facebook page at 
OR 
Before leaving my blog
get email updates by entering your email address in the right hand column where it says FOLLOW BY EMAIL.

Visit my Etsy store @

Tuesday, January 29, 2013

Summer Smooches Squares

In looking through some of my paper, I decided to try to use the scraps...instead of making more scraps. 
{{I am really good at acquiring scraps!}} 
Today's Designer Series Paper (DSP) is Summer Smooches. 

 I am sure if you are here it is because you have some interest in creating, either by appreciation or by making. Tonight I am offering a little blog candy...a package of Summer Smooches DSP...I'll take care of the shipping!!

  At the end of this post, 
leave a comment and you will be entered. Tell me ...Do you have a blog, do you Pinterest, are you on Splitcoast or do you have a FB page that you share your work on?
You have until Sunday night at 7 pm to comment. Check back then to see who the winner is.
Good Luck!!


Here's the Stampin Up! supply list for the 
Summer Smooches Squares Card:
  • Stamps: Blooming with Kindness c#126422, w# 126420
  • Ink: Rich Razzleberry #126950
  • Card Stock: Summer Smooches DSP #125049, Whisper White #100730
  • Tools/Accessories:  Little Leaves Sizzlits #114511, Elegant Butterfly Punch #127526, Pearl Basic Jewels #119247, 1 3/8 Square Punch #119877


If you love paper and crafting come join me by LIKING my Facebook page at 
OR 
Before leaving my blog
get email updates by entering your email address in the right hand column where it says FOLLOW BY EMAIL.

Visit my Etsy store @


Leave a comment below to win a package of 
Summer Smooches DSP!!


Monday, January 28, 2013

Mojo Monday 278


Welcome to another version of my Mojo Monday. Tonight I decided to create the square card. My card measures 5"x 5" and uses only one color of card stock and ink...
Perfect Plum.


Mojo Monday 278
Card Measurements: 
Card Base 5" x 5"
1st purple layer: 4 3/4" x 4 3/4"
1st white layer: 4" x 4"
Add 4" scallop strip on right
2nd purple layer (right underneath stamped image):
3 1/2" x 3 1/2"
Top white layer with stamped image:
3 1/4" x 3 1/4"
101889 Perfect Plum 8 1/2" x 11" Cardstock

126963 Perfect Plum Ink

119850  1 3/4" Circle Punch

 118874     2 3/8" Scallop Circle Punch

126420 Blooming with Kindness Stamp Set

126702  Trust in God Stamp Set


If you love paper and crafting come join me by LIKING my Facebook page at 
OR 
Before leaving my blog
get email updates by entering your email address in the right hand column where it says FOLLOW BY EMAIL.

Visit my Etsy store @
http://www.etsy.com/shop/ThePaperHen

Another version using two stamp colors...
Primrose Petals and Pretty in Pink
.

Wednesday, January 23, 2013

Scraplifted...CASED...Yes!!!

I had to CASE this Peppermint Patty Valentines idea from Pinterest. It was so cute and I just loved the colors. I used Pearson's Peppermint Patties that you can find at Walmart. Beware...a lot of mint patty companies have gone to little square packages. Unless your into taping down the corners so they don't show, be sure that the patties you buy are tight wrapped in foil. I used SNAIL adhesive on the back of the scallops and then stuck the patties to them.

Lovely Letters has to be one of my most used stamp sets, especially since I like to monogram things. The cellophane bag is 2"x 8" and can be found by searching Ebay.


Here's the Stampin Up! supply list for the 
Owl Love Mint Patties:
  • Stamps: Lovely Letters W#115030, C#127796
  • Ink: Real Red #126949
  • Card Stock: Basic Gray #121044, Real Red #102482, Pretty In Pink #126955, Whisper White #100730
  • Tools/Accessories:  Owl Builder Punch #118074, Full Heart Punch #119883, 1 3/4" Scallop Circle Punch, 1 3/8" Circle Punch, 1 1/4" Circle Punch, SNAIL adhesive #104332


Thanks for stopping by to take a look.


If you love paper and crafting come join me by LIKING my Facebook page at 
OR 
Before leaving my blog
get email updates by entering your email address in the right hand column where it says FOLLOW BY EMAIL.

Visit my Etsy store @


Tuesday, January 22, 2013

Sale-A-Bration 2013


It’s here! Sale-A-Bration 2013 has begun. How will you party during Stampin’ Up!’s premiere event? There are three ways—choose all that apply!
1. Host
Have your friends over for a party and earn fantastic Sale-A-Bration freebies with a qualifying order! For a minimum $150  party, you’ll get a FREE pack of Silver Glimmer Paper (silver paper for Stampin’ Up!’s silver anniversary!). Host a $400 party, and you’ll get the free Glimmer Paper PLUS a FREE product bundle—and that’s in addition to the normal hostess benefits (including $65 in FREE products of your choice)!
2. Shop
Shopaholics unite! For every $50 you spend, you’ll get a FREE Sale-A-Bration product—there are nearly 20 to choose from! Visit my Stampin’ Up! Online Store to start shopping.
3. Join
Party all the time when you become a Stampin’ Up! demonstrator. Plus, when you join during Sale-A-Bration, you’ll get 25% more products for FREE in your Starter Kit! 
Sale-A-Bration is one of the most exciting times of the year at Stampin’ Up! How will you Sale-A-Brate? 

Monday, January 21, 2013

Mojo Monday 277


Crosses of Hope

Crosses of Hope stamp set has two crosses that, with the clean lines, are easy to stamp and then cut out. The crosses on these cards are all cut out and popped with Dimensionals. 

Here's the Stampin Up! supply list for the 
Crosses of Hope Cards:
  • Stamps: Crosses of Hope W#117136, C#120567
  • Ink: Rich Razzleberry #115658, Lucky Limeade #122935, Pretty In Pink #126955
  • Card Stock: Rich Razzleberry #126950, Lucky Limeade #126984, Pretty In Pink #126955, Whisper White #100730
  • Tools/Accessories:  Dimensionals #104430


Thanks for stopping by to take a look. 

If you love paper and crafting come join me by LIKING my Facebook page at 
OR 
Before leaving my blog
get email updates by entering your email address in the right hand column where it says FOLLOW BY EMAIL.


Visit my Etsy store @


Monday, January 14, 2013

Owl Box Video Tutorial, Part 1 and Part 2

I will apologize up front...I sound like I have more of a cold than I thought. I think these two videos will help you to create your own owl boxes for any occasion. 


Owl Valentine Box Part 1

Owl Valentine Box Part 2


If you love paper and crafting come join me by LIKING my Facebook page at https://www.facebook.com/pages/The-Paper-Hen-Laura-Davis-Independent-Stampin-Up-Demonstrator/246429138779180
OR 
Before leaving my blog: http://thepaperhen.blogspot.com get email updates by entering your email address in the right hand column where it says FOLLOW BY EMAIL.
~Laura~


Easy Post-It Note Holders

Post-It Note Holders:

I used Stampin Up cardstock. It is a thicker paper and holds up well for projects like this.

Cut cardstock to 3 1/4" x 6 3/4"
Score at 3 1/4 on each end 
(meaning score at 3 1/4" and turn paper 180 degrees and score at 3 1/4" again) 
I use half of a Post-It notepad inside.
Decorate Front:
Front measurements: 
Base 3" x 3"
Designer Paper 2 3/4" x 2 3/4"


Floral District Designer Series Paper 126919


Thanks for stopping by to take a look. 

If you love paper and crafting come join me by LIKING my Facebook page at 
OR 
Before leaving my blog
get email updates by entering your email address in the right hand column where it says FOLLOW BY EMAIL.


Visit my Etsy store @
http://www.etsy.com/shop/ThePaperHen


Thursday, January 10, 2013

2012-2014 In Colors

Two of the colors I used on yesterday's project are from the 2012-2014 In-Colors....Primrose Petals and Raspberry Ripple. These colors will be around for quite awhile yet and are available in a special kit containing the ink and matching cardstock.


2012-2014 In Color 8-1/2" X 11" Card Stock And
Classic Stampin' Pad Kit                         126835


These cards were created using the two stamp sets: 
Thoughts and Prayers 127805 

Petite Pairs 122497


Thanks for stopping by to take a look. 

If you love paper and crafting come join me by LIKING my Facebook page at 
OR 
Before leaving my blog
get email updates by entering your email address in the right hand column where it says FOLLOW BY EMAIL.


Visit my Etsy store @
http://www.etsy.com/shop/ThePaperHen